Wednesday, September 30, 2009

Unique wall shelving system for your house plans

I ran into this interesting new wall shelving system the other day and thought I would let you in on it. The product is called Vita and it is produced by an Italian company name MDF Italia. It is a modular system made from medium density fiberboard (mdf). The system includes wall panels, shelving units and cabinet boxes. You can seemingly produce endless configurations based on how you put the modular components together. I think it is very cool and would be a great way of dressing up one of those blank walls in your house.


For more information on this see MDFITALIA VITA. Go to "products" and then find to "Vita".

The wall system is obviously quite contemporary but I think it would look great in a number of the Simply Elegant Home Designs house plans including the "scandia modern cottage" and the "marine farmhouse".

Tuesday, September 29, 2009

Three ways to wrap a chord instructional video

Fine Homebuilding has a series of instruction videos that I find interesting. Many of the videos are intended for professional carpenters. They illustrate tasks that the average layperson is not likely to run into. But they also have some videos that are good for the weekend carpenter or the handi-man. I'll post a few of these as I run into them.

The first one I will post a link to is "Three ways to wrap a chord". I like this one because it is one of the most frustrating things for a man in his garage. Check it out below.

3 Ways to Wrap Cords and Hoses

Three ways to wrap a chord

Monday, September 28, 2009

Main Ridge Vent Finished

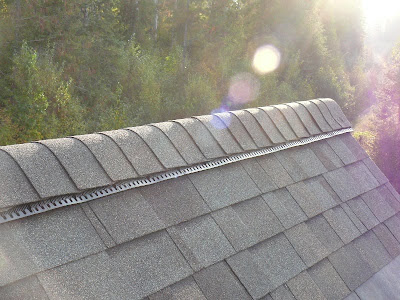
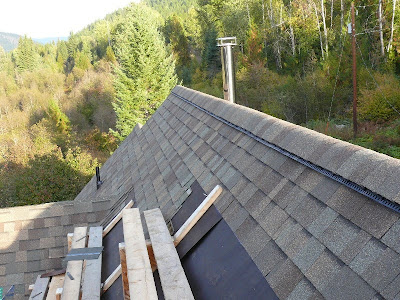
Today I finished the main ridge vent and have the top three feet of shingles installed from end to end now.


In a post about a week ago, I talked about the details of installing the ridge vent and cap shingles, and I mentioned briefly about nailing the last cap shingle down and covering the nails with silicone.

All along the ridge vent, each shingle is nailed so that the next cap shingle covers the previous shingle's nails. That's why you can't see any nails along the top. However, when you get to the end, obviously you still have to nail the last shingle down, but because it's the last shingle, there won't be another shingle to cover those nails.

So, you cover the nail heads with a bit of brown silicone, then you sprinkle a few shingle granules on top and press them lightly into the wet silicone. (There's always a bunch of loose shingle granules inside the plastic wrap from the bundles of shingles.)

The nail heads all but disappear, and from ground level you won't be able to tell at all.

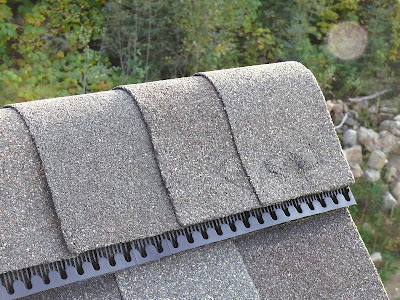
Here's with the nails showing.


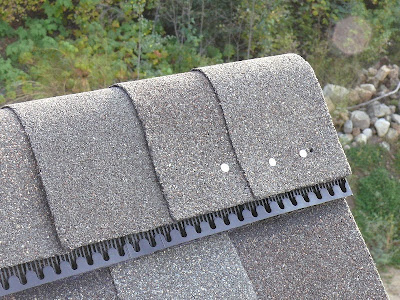
Here's with a bit of silicone.


Here's with the shingle sprinkles.

Sunday, September 27, 2009

Ring-Shanked Nails

For the roof platforms I use for shingling, I usually tack everything together with hand-driven 3" common nails because it's easier to pull everything apart when I need to move the platforms. Today I was reassembling one of the platforms and I didn't have any of the 3" nails within reach, so I grabbed my framing nailer and used it.

I use ring-shanked nails in my framing nailer. The rings are like little ridges on the nail. There is also a red coating on the bottom half of the nails, which I imagine is something to increase adhesion.

Anyway, after I was done with the work platform and started tearing it apart, those nails held so well that when I went to pry the top board off, it pulled the heads of both nails right through the top board. The nails stayed stuck in the bottom board. This has actually happened to me several times, and I'm continually amazed by how well those nails can hold.

Click on the photo below to enlarge it. You can see the two nails are still stuck in the bottom board after I've pried the top board off.

Saturday, September 26, 2009

Roofing Progress on the Back of the House

I've been fortunate to have a couple days of really nice weather and I'm making good progress on shingling the north side of the house.


Another New Garage Apartment Plan Unveiled!

Simply Elegant Home Designs is unveiling "The Minnetonka Garage Apartment"; the second in a new series of Garage Apartment Plans that they are developing.

The idea of an above garage apartment is not new, but it seems especially appropriate for the times we are in. Families are struggling with reduced income, or are looking for alternative housing solutions for their aging parents. An apartment garage plan can be a perfect place to house the still active mother-in-law, or it can used as an income generating rental unit.

The Minnetonka Garage Apartment as seen below incorporates a studio apartment space above a generously sized three car garage. The apartment plan accommodates a kitchen, eating area, living / media zone, bed area, storage and a full bath. The dormer placements create distinct spatial zones for the kitchen and sleeping areas. Bead-board paneling used as a wainscot and within the cabinetry brings a cottage charm to the interior. The exterior is a modern interpretation of the shingle style incorporating clapboard siding, cedar shingles and a metal roof. For more information on this plan click the following link:

Simply Elegant Home Designs will be developing additional garage apartment plans over the next several months so stay tuned.

Sunday, September 20, 2009

Ridge Vent Details

When you build a roof, it has to be built so that air can move freely between the underside of the roof surface and the top surface of the roof insulation. One of the methods by which this is done is to use a ridge vent. This diagram gives you an idea of how it works.


You can see the long narrow opening along the peak of the roof. The opening is approximately 1.5" wide, and runs the entire length of the top of the roof except for about 4' on either end.


The ridge vent is made of flexible plastic and comes in a roll 30' long and 14.5" wide. It gets folded over the peak of the roof and nailed down along the edges. It allows air to flow up through the slot in the roof and out the sides of the vent.


The cap shingles are installed on top of the ridge vent. You start installing the shingles on one end of the roof, and install them so that each shingle is overlapped by the next one. The nails are always covered by the next overlapping shingle... except for the last shingle. On that one, I'll put some silicone sealant on top of the nail heads.

Flashing The Dormer Peaks

The point at which the peak of the dormer meets up with the main roof is one that has to be flashed carefully. In addition to using the peel-n-stick flashing, I've built up another layer of protection using aluminum strip-flashing.

I first cut a piece of aluminum L-flashing about 2' long. I cut along the fold line for about 8" and then fold the ends up a bit. I then lay it over the peak of the dormer with the two legs laying flat on the upside of the main roof. I don't put any nails within 6" of the peak of the dormer.


Then I cut a piece of 9" flat aluminum stock about 12" long. I cut a V-shape out of one end, and lay it down over top the first piece of flashing. I then put a generous amount silicone sealant along the seam where the two pieces overlap.


Lastly, I lay another piece of peel-n-stick flashing over the top edge of the aluminum flashing. Once the shingles are in place, I don't think I'll have any problems with water coming in here.

The most important thing to remember about roofing is that for any for any two pieces of roofing material... whether it be tar paper, or peel-n-stick flashing, or shingles... the upper piece must always overlap the lower piece. Always. Always. Always.

New Garage Apartment Plan Unveiled

Simply Elegant Home Designs is unveiling "The Marine Garage Apartment"; the first in a new series of Garage Apartment Plans that they are developing.

The idea of an above garage apartment is not new, but it seems especially appropriate for the times we are in. Families are struggling with reduced income, or are looking for alternative housing solutions for their aging parents. An apartment garage plan can be a perfect place to house the still active mother-in-law, or it can used as an income generating rental unit.

The Marine Garage Apartment as seen below incorporates a studio apartment space above a generously sized two car garage. The apartment plan accommodates a kitchen, dining area, living / media zone, bed area, storage and a full bath.
Simply Elegant Home Designs will be developing additional garage apartment plans over the next several months so stay tuned.

Tuesday, September 15, 2009

Bark Siding

I just ran across this new product that is really very old - Bark Siding. It is made from bark that is harvested off of trees that are felled for other purposes. The bark is then flattened and kiln-dried and that's it. No preservative treatments or special coatings. You install the siding and leave it alone. See photos below.


The look is definitely on the rustic side, so it's probably not a great candidate for your urban infill projects. But it does look at home in a wooded setting, which might make it a good choice for your cabin plans.

The product is touted as being long lasting and sustainable, although I am always wary of manufacturer claims. You can check this out at the manufacturers website Bark House Siding

Anybody have any experience with bark siding? Please throw your two cents in.


Monday, September 14, 2009

Getting Ready To Shingle Again

I've been getting ready to start shingling the back side of the house. This time I'm installing all the work platforms first, across the entire roof, rather than just for the section I'm working on. I'm hoping that will speed up the entire shingling process.


Thursday, September 10, 2009

Drum Roll Please

Today I finished the shingling on the front half of the roof.

Wednesday, September 9, 2009

Flashing The Front Of The Dormers

Any time there's a change in a wall-to-roof plane, it's a possible trouble spot for moisture problems. I've installed aluminum flashing (known as apron flashing) where the main roof meets the front wall of the dormer. The flashing sits on top of the shingles and then continues up the wall underneath the housewrap. This gives the best protection against water getting underneath the shingles.

At the corners of the dormers, I've also fashioned a kick-out flashing which continues past the step flashing. This will prevent water from running down the side of the dormer and turning the corner to possibly get in underneath the apron flashing.

Once everything was in place, I added a bit of silicone sealant to the inside seams and brought the housewrap down in front of the flashing.


Wednesday, September 2, 2009

Roofing Update

Still working my way down the roof. Almost finished this side.

Tuesday, September 1, 2009

House Plans_ Good Design Illustrated 1

Last week we announced we are now selling house plans designed by Larson Brenner in Stillwater, Minnesota. We think that these designs are special in the way they cleverly pack function and convenience within a fairly modest floor plan. In order to convey that idea I am today beginning a series of postings on planning features. The idea is to illustrate good design principals by highlighting features on the plans. So this will be the first in the series.

The floor plan shown below is the Prescott Cottage, designed by Larson Brenner Architects. My comments are shown right on the plan. You can get a little better look by going to the Simply Elegant Monthly Newsletter.