
Monday, November 30, 2009
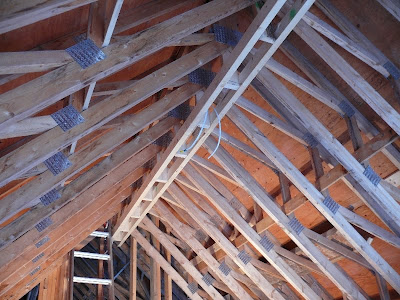
Framing A Fake Roof Girder
Although there is no main roof girder in the bedroom area, I wanted to frame it up so that it would look like there was. That way... when the ceilings are all finished (i.e. drywalled & painted, etc.), the ceiling in the bedroom will be consistent with the ceiling in the main part of the house.
Sunday, November 22, 2009
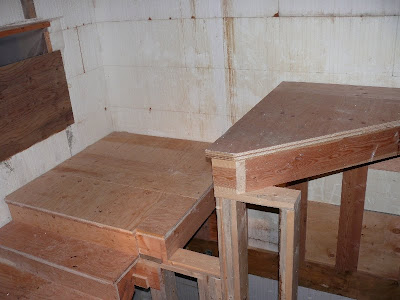
Main Stairway Finished
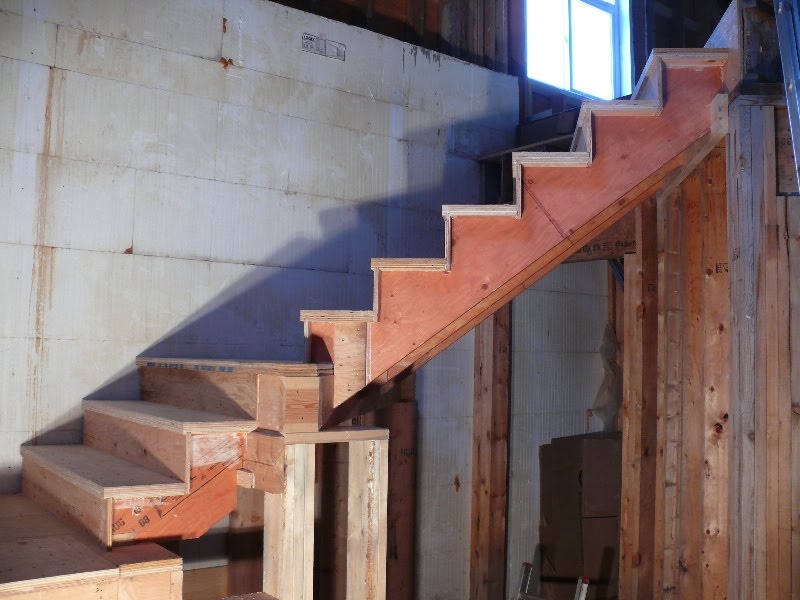 I finished the stairs to the loft today. All in all, they turned out well and I'm very pleased with them.
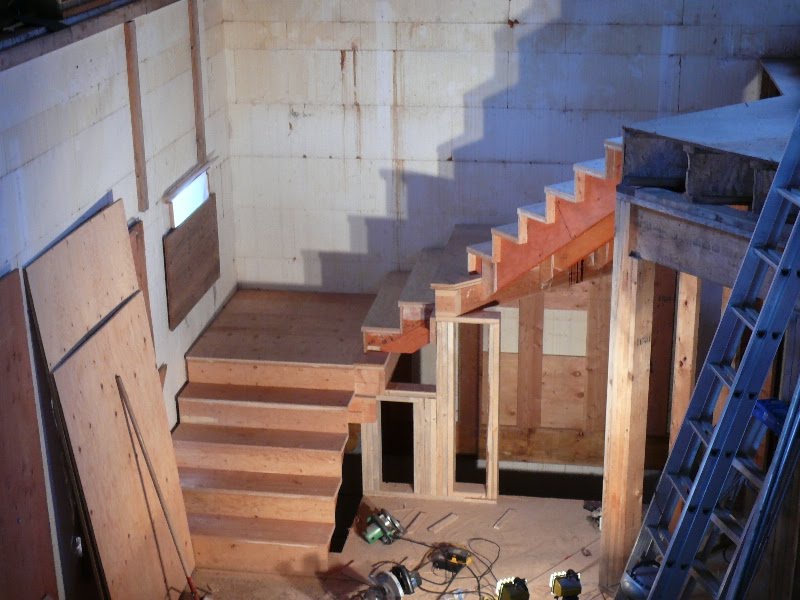
I used my table saw to cut the dadoes in the stair treads and the risers. I don't have dado blades, so I just make several passes; moving over 1/16" each time.

The top of the riser fits into the bottom of the stair tread, and the back of the stair tread fits into the bottom face of the next riser.

Wednesday, November 18, 2009
Groundwork
This week we have been stuck at the shop most of the time since the groundwork we need done is being postponed due to icy roads that the heavy equipment can't travel on. (11/16 - 11/20)
Monday: It snowed over the weekend, so we spent this class period moving snow off of the piles of materials we had outside.
Tuesday: We moved the tool shed using 6 inch steel pipes and a pint of elbow grease. After sweeping and shoveling; we worked into the night pushing the rolling shed to its new home 50ft away.
Wednesday: Since we are still at the shop we cleaned up the equipment cage, assembled concrete forms for our deck pilings, and cut and bent re-bar to strengthen them.
Friday: We reviewed blueprints to get a list of materials we would need to cut so we can frame the first floor after the groundwork is finished.

Back to school, back to school...
Monday, November 16, 2009
Efficient Framing for House Plans
- use 2x6 wall framing at 24" o.c. (in lieu of 16" o.c.)
- use 1" rigid foam insulation in lieu of traditional sheathing
- eliminate headers where they are not necessary structurally - where they are necessary size them properly (it is common practice to use the same size header throughout)
- eliminate all the corner framing - let the drywall hang loose or use clips
- use header hangars in lieu of jack studs
- eliminate one of the top plates

I happen to agree that all of these ideas are good energy savings tips. Some builders however would argue that they are not necessarily cost savings. For instance eliminating one of the top plates may complicate the drywall installation. Eliminating the wall sheathing means using other methods to ensure shear strength. So before you implement any of these ideas on your new house make sure you talk through the implications closely with your builder. I also suggest having a residential structural engineer look at your new lightly framed house to make sure it won't tip over when the big bad wolf blows on it.
You can see the entire fine homebuilding article at "The Future of Efficient Framing"
Friday, November 13, 2009
Insulation
This week we worked on insulating the house. (11/9 - 11/13)
-Monday: We added foam insulation to the sides of the house, the foam is 2" thick, and when added onto the ARXX blocks it gives us a total of 4" of insulation on the outside.
-Tuesday: Added Soprema water proof insulation on top of the foam to keep the water out.
-Wednesday: Veteran's Day, no school.
-Thursday: Added dimple matting on top of the waterproofing.
-Friday: Clean up day, made sure everything was ready for the snow that is scheduled for the weekend.
The foam insulation that was added to the sides.
Design Challenge for a 2000 SF House Plan
Lately I have been getting inquiries for modestly sized new home designs that feature main floor master bedrooms. A search of the web reveals a gazillion main floor master bedroom plans - but most are massive or ugly or both. So I decided this might be a good opportunity to design a new plan fitting this unique need, and to illustrate for you a little bit of the design process at the same time. So let's get started.
The design process I use typically involves the following phases:
- Programming
- Schematic Design
- Design Development
- Construction Documents
Today we will start with Programming. Programming really means just identifying a list of functional needs and qualities that you would like to see in your home. I'll start with a list that reflects the kinds of requests I have been receiving.
- Modest plan size - as close to 2000 square foot as possible.
- Open floor plan - Living, Dining and Kitchen spaces very connected with each other.
- Mudroom with space for hanging coats and sitting for putting shoes on.
- Laundry space should be on the main floor.
- A main floor master bedroom with walk in closet and bath. The bath should have a walk in shower, but not necessarily a tub (the days of the jacuzzi tub seem to be over).
- Spaces that are functional, but not over sized.
- A reasonable sized entry porch.
- A screen porch with spaces for eating and sitting.
- A main floor powder room.
- Possibly a den or away room - if space allows.
- An attached 2 car garage - possibly with some additional storage space.
- 2 additional bedrooms on a second floor.
- A shared bathroom for the 2 upstairs bedrooms.
- A basement that could allow future expansion space.
- Beautiful home but not overly complex. Should be reasonably economical to construct. The house plan should be simple, yet unique.
That's a pretty good list for now. But I wanted to leave room for your thoughts. So please feel free to comment. Did I miss anything? Throw your 2 cents in.
Next posting I will update the program with your relevant comments - and we'll see some initial design thoughts.
Wednesday, November 11, 2009
XHouse2 Construction Prints available starting Yesterday!
We are very happy to announce that the Construction Prints for the XHouse2 are complete, and available from the catalog page.

This is the first design from our summer '09 push to post new designs. It took a little longer than hoped to get the first Construction Print set posted, but that always seems to be the case. Next we are going to focus on the XHouse3, as we see its moderate size and compact footprint being appropriate for the times. Look for it in early 2010.
The XHouse2 at lamidesign.com/plans
Stairway Progress
 I've got the steps up to the second landing done. If anyone ever tells you that stairs are easy to build... they're lying.


Monday, November 9, 2009
Stemwall Pour
Week (11/2 -11/6)
Monday: Today we put up scaffolding and added a railing for safety, cut re-bar that would later be placed in the stemwall for support, and made other preparations for pouring the stemwall.
Tuesday: Continued to cut the re-bar, put up some more turnbuckles to help keep the walls in place, put the last of the ARRX blocks on.
Wednesday: We made the Final preparations for the pour, we tied the re-bar inside the wall, tied the blocks down secure, and poured concrete today. Some of our crew stayed later to help finish the pour while the rest left.
Friday: cleanup, made sure our site was all nice and tidy so we could move on to the next step.

Sunday, November 8, 2009
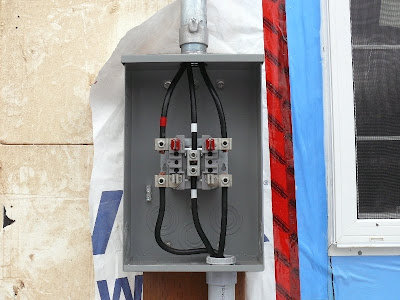
Electrical Service Panel
I've got my electrical panel installed now. The electrical code says that the electrical panel must be installed "as close as practicable" to the service entrance (i.e. meter base on the outside), so I've installed the electrical panel just on the other side of the wall from the meter base.
I've used 2" PVC conduit to go down from the meter base and through the wall to the electrical panel. There are three 2/0 gauge wires that run through the conduit. The wire is very stiff and difficult to work with, and it took me an hour of pushing and pulling and cursing to get the three wires through the conduit.
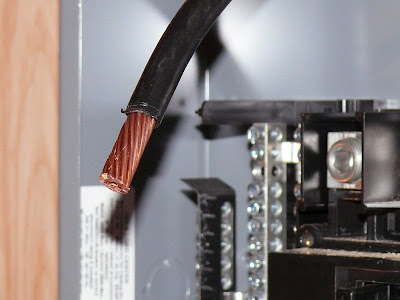
The center wire (white tape) is the neutral wire and the other two are the "hot" wires.

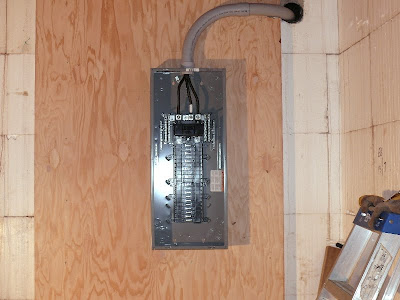
Oh yes... there is no power on any of this yet. I wouldn't be doing any of this if there were. Once I have everything installed the electrical inspector will have a look at it, and if he approves it then the power company will come and install my electrical meter and hook me up to the grid.
Friday, November 6, 2009
How to design a bay window!
I have had many clients in the past tell me they want a bay window. Sometimes I have been a bit reluctant to the idea because I have seen so many bad examples. The image below is a very typical example of the contemporary application of the bay. To me this just looks like they cut a hole in the wall and slapped on the window unit. It just doesn't look integrated.
Don't do this!
 On the other hand my recent trip to the Napa Valley area reminded me that the bay window can be a beautiful design element when properly integrated with the architecture of the house plan. Here are a few examples on mostly craftsman style houses - all discovered in the town of Napa.
Square box bay instead of the typical angled sides. Simple shed roof with exposed rafter tails and supporting brackets. Shingle siding wraps the box out.

Here the bay walls simply extend up until they meet the roof overhang, which is deep enough to receive them. The continuous trim above the windows and the cedar shingles also help to integrate the bay properly with the house. The brackets below help to give the bay a sense of support.

Here is an angled bay window fitting below a square gabled form. This gable integrates with the house in much stronger way than our "don't do this example". Also note the small window below the bay. This completes the composition and reinforces the idea that the bay was not an afterthought.

My favorite bay window example in Napa. You can tell the designer spent a lot of time studying the form and detail to properly integrate with the house. Beautifully executed!

Wednesday, November 4, 2009
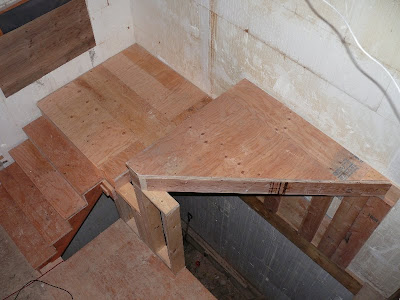
Second Landing Done
I've finished building the second landing for the stairs up to the loft. This one was a bit more difficult because of it's shape.


Tuesday, November 3, 2009
XHouse Cladding Options
We've completed a drawing sheet showing a range of 3 cladding options for the XHouse series of designs. This will be included in each plan set for the XHouse collection.
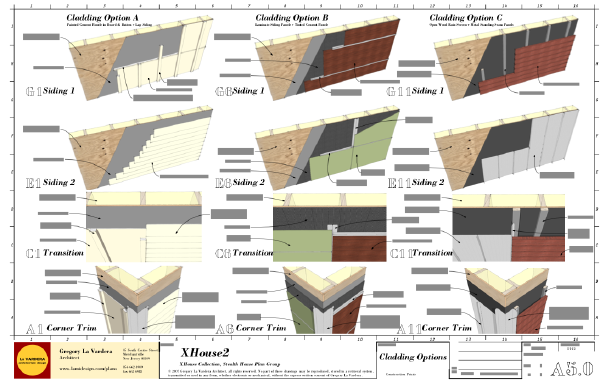
Our Construction Prints have always described a range of siding materials in the Owner's Choice portion of the Material List. The idea here is to show a range of siding options, from simple to more complex which would be specific to the designs. They also range in cost from less to more expensive, but our plans have always been about an open ended design that allowed the home owner to tailor the build to their budget and taste.
The first option is for painted cement siding panels a combination of board & batten and lapped siding patterns. This is the default siding pattern that is shown on our Original Collection designs. The XHouse designs also lend themselves to this cladding option as they typically include two different siding patterns on the walls. This is an accessible option as there is nothing tricky or unfamiliar about the installation, and most contractors will be completely familiar with this.
The second option is for a combination of laminate siding panels and through tinted cement siding panels. In this case the laminate siding panels are shown in a wood grain pattern. There are many siding panels available with this appearance, some with a resin impregnated wood surface, and others with a printed plastic laminate face - think formica for the walls of your house. The installation is shown for 24" high panels with metal flashed horizonal joints. This is not an inexpensive material but is quite handsome. The cement siding in this case is a through tinted material that requires no paint. The installation is a grid of panels with joints backed by metal flashing - no battens. This includes the addition of a drainage layer behind the siding for superior performance.This very siding scheme was featured on the 0751 RS House, and you can see it in those illustrations.
The third option is a combination of open wood rain screen cladding and standing seam metal panels. The rain screen is a recently popular look on many modern houses, and this is in fact the cladding scheme we have been featuring in the illustrations of the Xhouse Series designs. There are a range of woods that can be used for the siding planks, but the key component of this system is the vapor permeable water barrier that provides the final weather barrier for the wall system. The metal cladding is used on smaller portions of the XHouse designs, but is an important part of the overall look of the houses.
Just a little bit more work to complete on the XHouse2 Construction Print set. Look for the official intro before Thanksgiving.
Sunday, November 1, 2009
Shingling All Done
 With the help of some good weather and despite a seemingly endless list of other things to do, I've finally finished shingling the back of the house. My days as a roofer are done for now.
Subscribe to:
Posts (Atom)