Orienting a house design to the sun is easy. But put it on a small urban/suburban site, introduce a street grid, suddenly everything may not be going your way.
We admit that we've designed ourselves into this corner to a degree. We've made a decision to use an asymmetrical massing for the house which in turn dictates which way the house massing must be oriented for the sun. Its not completely a fabrication however as the asymmetrical profile does serve the small footprint of the house allowing us to make a 1.5 story design on a narrow dimension. But it does impose restrictions such as the dictate on solar orientation. Working with such limits introduces compromises which can be at once necessary and pleasing as they can create unexpected quirks or complexities to a design. And so we have here with our Lagom House as we strive to create variations on the design to accommodate different site orientations while maintaining the necessary solar orientation.
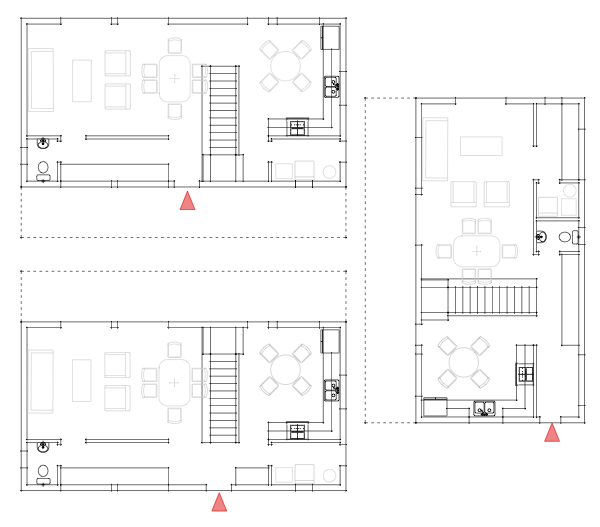
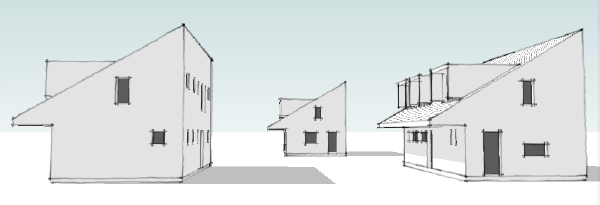
I've hinted at this in the past posts on the design process as I've been developing all three versions of the house concurrently, yet I've been using only one to share the progress of the design. So new we have three prototypes, two for streets running roughly east west, one for the north side of the street with the sloped roof facing the street, and one for the south side with the sloped roof facing the rear yard. The third version for north south streets slopes the roof towards the side yard.
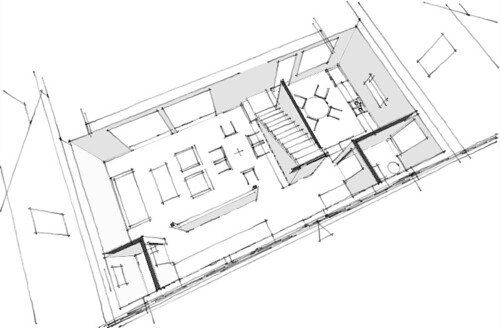
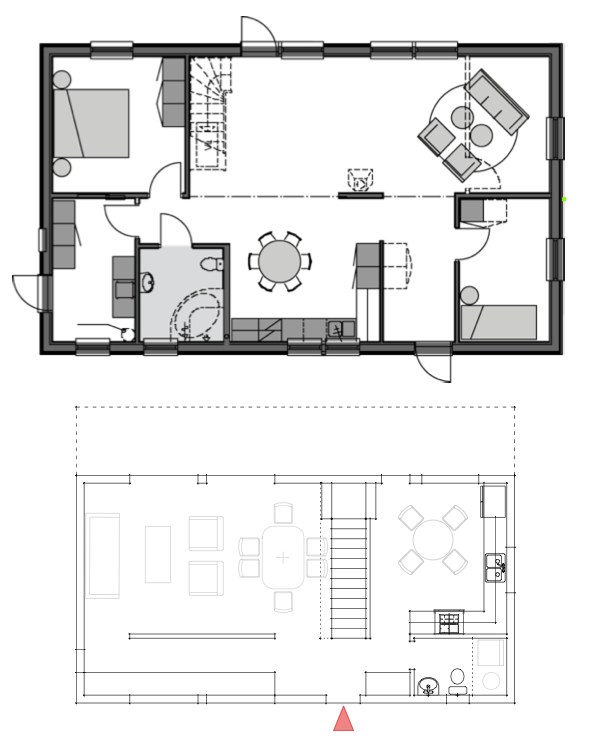
The south side version is what we've been looking at, so lets look at how the floor plan shifts for the north side. The ground floor plan is essentially the same except for the flip of the relative direction of the stair. The front door shifts slightly towards the living room, and the foot of the stair is now right beside the entry foyer. This is not at all a bad arrangement and still retains the ability to step up and through the landing and proceed to the kitchen. A little bit more subtle is the change in orientation for the bedrooms, now facing the front yard rather than the back yard. This is not a great compromise in privacy, but some people may have a distinct preference.
The east west version makes greater compromises. First the plan never really makes an complete change over to the narrow deep orientation as it still relies on access to a reasonable side yard. The kitchen retains a door now on the side of the house, and the living areas dual doors are now shared one on the side and one to the rear. The entry consumes a good portion of the "service corridor" portion of the floor plan in this scheme. While there is a bit more storage as a result the home office area and utility room suffer for the loss of space to the foyer. It is possible that some of the mechanical equipment could find a place under the stair or in the new storage cabinets running on the outside wall between the kitchen and living room, but I did not want to assume that while laying out the plan.


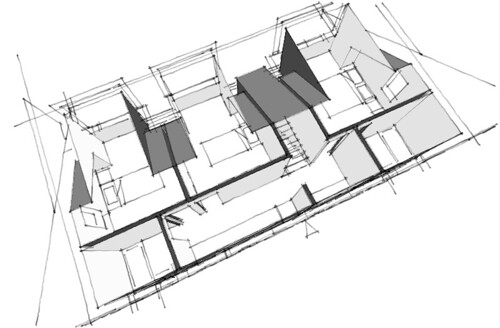
We've shown the development of the massing and the ground floor plan, but before we proceed to the solar orientation variations on the house we need to look at the second floor.
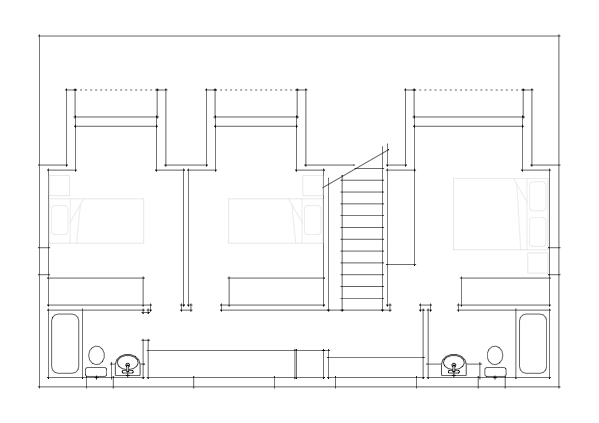
Each bedroom includes a dormer that extends the area of the room to a tolerable size. These are not big bedrooms - they are for sleeping, really not much room for a lot more than that. I think the closet space is good however, and if done with a wardrobe unit it can eliminate the need for a freestanding dresser which there is not really room for. If you can do that you will have room a chair by the window. At the top of the steps is a large window with a window seat. This may or may not be desirable depending on your site, but its a nice opportunity for a unique sitting place that makes the house live larger. Also in the upstairs hall is the kids homework desk - a long affair wide enough to manage two kids, computers, and crafts. Some space is reserved for a hall linen cabinet as well. Then we have two bathrooms at opposite ends of the house. The hall bath for the kids, and the slightly larger bath off the master bedroom. The hall also can provide access to an attic level HVAC unit if needed. The attic space is not large, but can provide needed mechanical space depending on the mix of equipment you need for your region.
So there is the basic second floor arrangement.


Discussion on the previous post led me to work the floor plan some more seeking to gain back the legitmate laundry + utility room, and the ground floor powder room we believe Americans will demand.
Just not comfortable with the combination powder room + laundry + utility room from the first go round of the floor plan, we dove back in to see where we could possibly trim fat. Well the answer it seems was staring us in the face, and that was the 16 feet of available desktop space in the home office area. Now 16ft would be great, especially if you wanted to accommodate two people. But we will have an upstairs "homework" desk for the kids so we don't have to have space for them here. Plus having a legitimate kitchen table also makes a great place to do homework. So we resolved to carve a tiny powder room out of the home office.
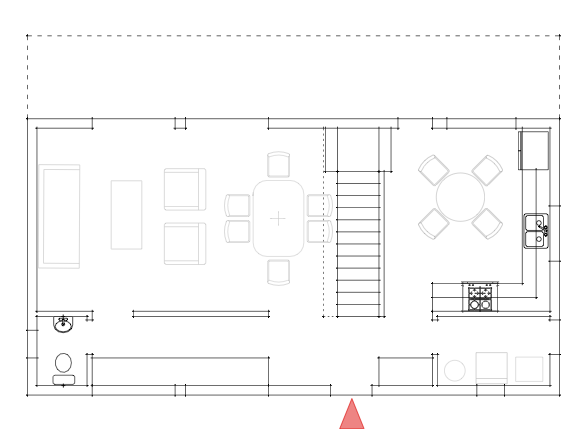
The result is still over 12ft of desktop length. Certainly enough for two people, or the option to have a vertical storage cabinet. The powder room is small and will require a tiny wall hung sink, but a small compromise really. Meanwhile back on the other side of the plan we have the old combo space now completely dedicated to laundry and utilities. I'm relived that I can make more space here because it widens the options for HVAC systems. This is important if people want to include a solar water heating system or AC air handler or whatever is appropriate for their climate. Side by side rather than stack laundry is also possible if your HVAC needs only one piece of equipment. We can also gain an entry door through the laundry + utility room, which is not something everybody wants or needs, but if you like that direct access its great that you can have it in this small floor plan.
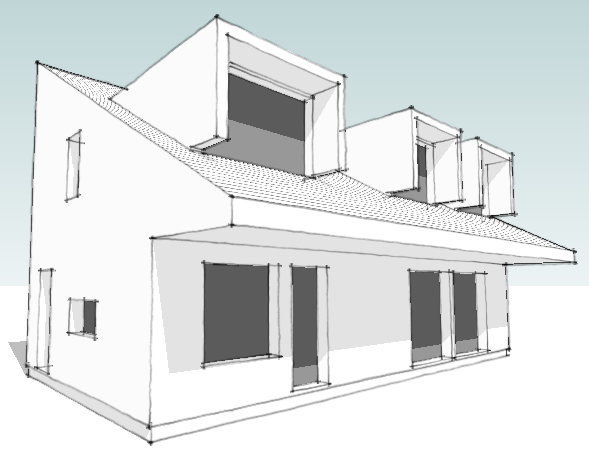
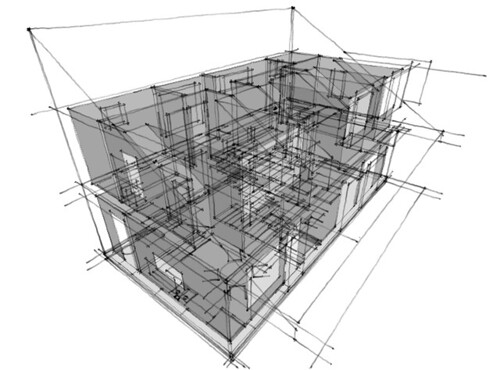
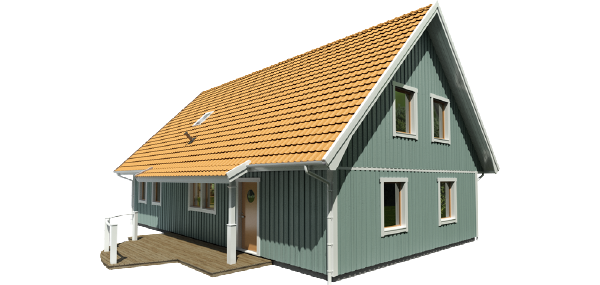
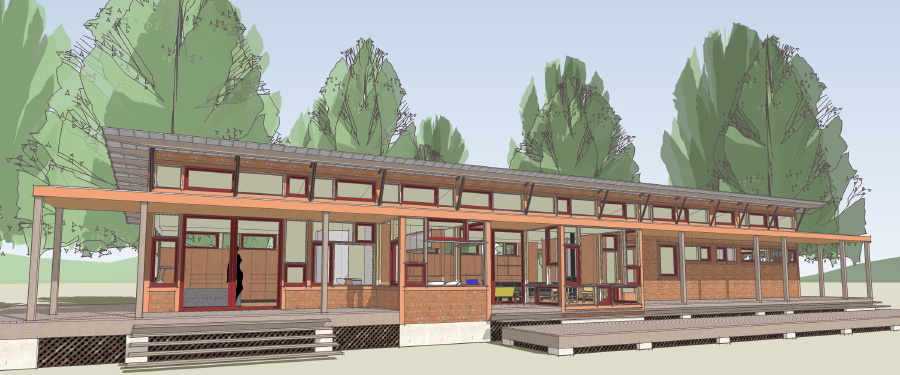
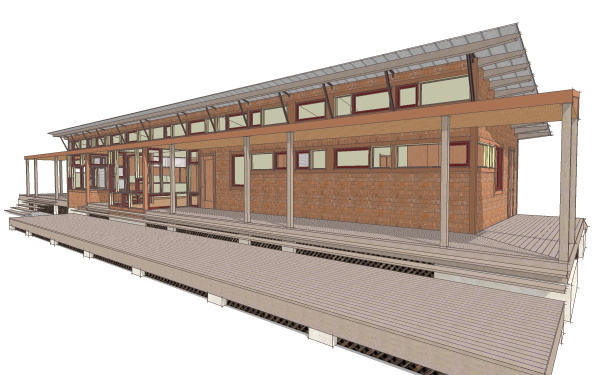
The developing massing model is a bit more informative than the prior wire-frames. The next step is revisiting the alternate floor plans. With the massing of the house having such a definitive solar orientation we now have to consider the situation where the house could be on the other side of the street. In other words facing the wrong way for our solar platform. We also have to consider street orientation - currently it works on a street running east west, but how about north south streets. We need a variation that has a front door on the end of the house.


The compact size of our proposed design triggers a series of compromises. We look at the plan of the typical Swedish catalog house to see if we can gain any insight.
Part of our effort to keep the footprint of the contest house design small also limits our options. We want the living spaces to feel spacious and open, yet our experience is that running any interior room from side to side in a house actually contributes to it feeling smaller. Somehow the presence of a "space beyond" where you are, or a "space between" here and there can contribute to a home feeling perceptually larger. When a house is small this becomes an important consideration.
I've placed the plan of the Anebyhus Lygnern design above the sketch of our contest house plan. The first thing we notice is that the Swedish house is essentially a 1 story design with two bedrooms on the ground floor. Officially it is what the Swedes call a 1.5 design, or a one story house with the option for the finishing of the second floor. That option would add 3 bedrooms, a bath, and a common family room to the home effectively doubling its size. With the upstairs finished the house tops out at around 2000sqft, 33% more than our target of 1500 sqft.
Yet there are significant things going on in the Swedish plan that save space. Things that are considered floor plan "poison" in the US. These are not criticisms of the Swedish design, but rather highlights of different cultural expectations in the US and Sweden. First of all the master bedroom shares its bathroom with the secondary bedroom - no private master bath. Compounding this is the bathroom is also doing duty as a powder room for guests. The second bedroom is also awkwardly located right at the entry foyer. Now if the second floor was completed, all of these issues resolve - the second bedroom becomes an ideal home office. But we will still find only one shared bathroom upstairs. Yet all of this shared bathroom saves space and makes for the opportunity for a very useful utility/laundry room. This is something that we are forced to sacrifice in order to create a first floor powder room. Utilities and laundry relegated to a closet in the same space - not a flexible solution. The American expectation for a master bathroom, and the awkwardness of sending a guest upstairs to find a bathroom puts us in the difficult position to provide 2.5 baths in a compact 1500 sqft home. Yet if we can package these desires into a plan at this size we've put good value and greater market appeal into a small house.


I've begun sketching out the massing of the house - wireframe drawings posted
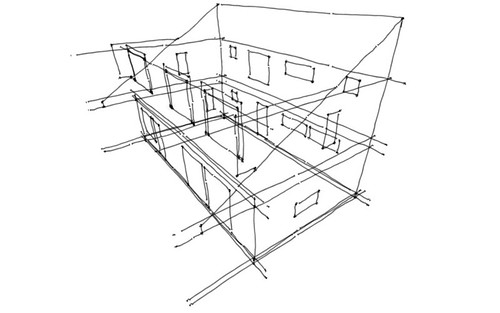
I am planning on using a single slope roof with the intention of the house facing sunward, so that the upper portion of the roof slope can form a platform for solar collectors. Its functional, but also a design element - overtly stating its purpose through its form. Solar collectors could be placed on a conventional roof profile but that would make less of a statement. Scott and I are having a bit of a debate about this right now. He feels that profile is too much "design statement" and not enough "design solution". We don't agree here, and I acknowledge that the kind of modern houses in the Swedish catalogs are much more modest in their architectural exuberance. Yet compared to the range of wild design themes often used for high end modern houses, and the quietness of authentic vernacular homes, I do think I'm striking a good balance. Not only here but in the design themes of most of our house plans.

I'd love to hear readers opinions on this. I know there is not much here to react to yet, but you could look back to the XHouse3 for example and have the same discussion. If we want modern to live in the mainstream of home building in the US, what is the proper level of design? How far do we push it, how extreme or modest is going to be successful in the wider market?
example of swedish modern/traditional (MoTrad) house: Anabyhus Lygnern
The Who's Next contest did not provide a list of rooms or size for the home, but rather a profile of the owners leaving the contestants to determine the appropriate response.
We are really left to make the size of the house as we see fit which should elicit a interesting range of responses from contestants. We have elected to use the "Starter House" profile offered by the organizers. The profile tells us the owners will have 1 or 2 children, so we are going to take that as a need for a 3 bedroom house. We want to keep the house compact, and to us that means pushing the boundaries of what we already offer in our catalog. So our goal is to make this home design smaller than any other 3 bedroom house in our collection. In keeping with the idea of a "starter house" we are shooting for 1500 sqft. A home office is called for in the profile but to hit our target size its doubtful we can fit a home office the size of a 4th bedroom. There are many more factors from the profile, some of which we may or may not be able to satisfy within the size limit we are imposing. But that is our choice and points towards what will be our guiding principle for the design.
Scott Hedges introduced us to a Swedish concept, an idea that does not have a single word representation in English. The word is "lagom" (sounds like La-Gom) and in Sweden this is an idea which underlies much of the culture and disposition of the Swedish people. An adjective, lagom means roughly "just the right amount" or "just enough is best". Its a sentiment of appropriateness as well as modesty, quite the polar opposite of the driving motivation in the US of more is (almost) always better. We don't have a word for this idea, because we basically never think this idea. Scott described it to me well:
"The idea of Lagom as I understand it is that it means “the right amount” or more accurately “an optimal amount” … but this doesn’t get it either … Lagom conveys the notion of having just what you need and no more. It means more than just what is good for you, but good in a more expansive and considerate sense. It is the idea that nothing should be added and nothing should be taken away. "
That last thought really hits it home for me. Nothing added, nothing taken away. It suggests virtue in balance, and balance to me is a driving concept of sustainability, not just in building, but in living.
So with Scott's encouragement I want to endeavor to make lagom the driving principle of this design. As an idea it was not completely unfamiliar to me. I believe that there is a parallel sentiment in the community of people that have driven the revival of modern houses over the past 10 years - what I call the ReModern Movement. Way back when Dwell magazine first started and I was spending so much time on their first internet messageboard there was a strong consensus about what having a modern house meant to the people that came there looking for homes. It was not a simple aesthetic choice, or style choice. To these people a modern home meant moving towards a simpler and more manageable lifestyle. A choice that would bring you a fresh start to concentrate on what was important to you, and to brush aside the baggage and associations of past ideas of what constituted "home". It was a lifestyle choice that would enable you by lightening the burden of creating, maintaining, and paying for a traditional image of home. Instead replaced by a simpler, cleaner, easier living home - something that did not make demands on you so much as serve you in your pursuit of life. It was not the pursuit of the modern home as an extraordinary trophy, but rather the desire for the modern home as ordinary in every sense.
We never had a word for that idea. But lagom comes pretty close, pretty close indeed.
We have begun working on a new house for a design contest we've entered called Who's Next and sponsored by house plan publisher FreeGreen.

Regular readers of our blog may remember that our 0751 RS House design is sold through FreeGreen's Open Source house plan market, and not here on our own site. Open Source is a great way for architects to get into the house plan business, and we've been supportive of the marketplace as a way to make good design more available via houseplans. And that brings us to the design contest. Unlike most design competitions Who's Next does not use anonymous submissions. Anonymity is usually used to rule out bias in judging, but what is lost is a great promotional opportunity. What this means is that I can share my work on my entry here on the blog and you can watch the entire process of the design coming together over the next few months. There is no requirement that we keep our work under wraps till the contest is over in order to hold anonymity. Whether we win the contest or not the design will find its way into our plan collection.
The competition offers two profiles for the hypothetical occupants. The first is called a "Starter Home" for a young couple with plans for 1 or 2 children. The second is for a couple with grown children with plans to retire in the house. Also on the agenda is to use sustainable and green design principals for the house designs. We are expected to choose one of the two profiles and work towards a solution for that scenario. While its an interesting contest we also have our own agenda to bring to the table, and in fact we are using the contest as an excuse to work through a number of issues that have been central to the ideas discussed here on the blog.
The first idea will be to create a compact and efficient house design that we see as being the way forward in the post-housing bust world. This is something we've begun promoting through our XHouse collection and we see this contest entry eventually fitting in to that plan group.
The second issue will be to specifically address sustainable building practices in our design, and eventually our plan set. We've always taken the approach that our house plans were ready to accept emerging green tech, but left this open ended. The contest entry will be more demonstrative, and the specifics will find their way into the Construction Prints.
And finally this contest entry will be our first practical application of some of the building techniques from Sweden that we have been studying and reporting about on the blog here. Our correspondent from Sweden, Scott Hedges, is going to be consulting to us and giving us feedback on how to apply some of their practices here.
Watch here for updates on the design process.

After a delay work is underway again at the site of the NJ RS House.
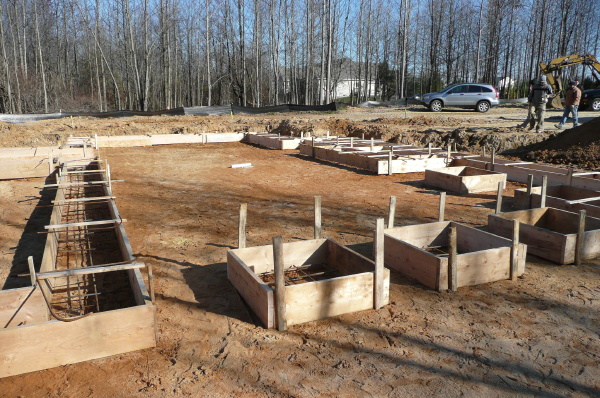
Foundation forms were set up this week and concrete should be placed on the following Monday. More photos in a slide show viewer after the link.
Plans for the two story version of this house design are available through the Open Source catalog page.

Our newest plan set, a three bedroom version of our popular Plat House design, is complete, Prints ready, catalog page posted, and flowing through the internet tubes.
Without further delay we give you the link to the catalog page:
Many people have asked for it, many have wished for it, almost everybody has suggested it. And today its here, the Plat House they have all been waiting for - one with three bedrooms.
The three bedroom Plat House 3 still comes in at a svelte 1,650 sqft making it the smallest three bedroom house in our catalog. It gives up very little in its transition from a two bedroom cabin. From the outside it looks much the same, with the length extended on the bedroom side of the house. A third bedroom equal in size to the second bedroom completes the pair with the bathroom now between them. A catalog page is forthcoming which will show this all clearly. In the meantime the Construction Prints are already done and available. If you do wish to order before the catalog page is posted contact us.


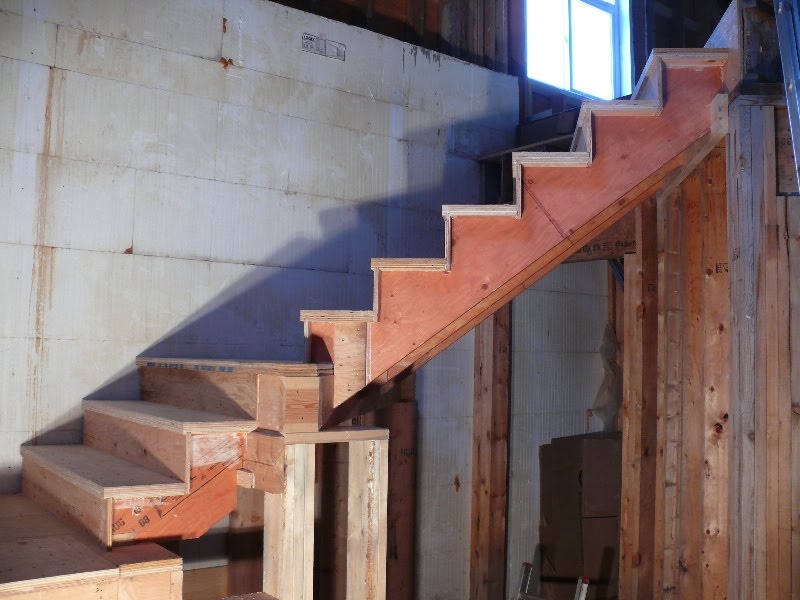 I finished the stairs to the loft today. All in all, they turned out well and I'm very pleased with them.


We are very happy to announce that the Construction Prints for the XHouse2 are complete, and available from the catalog page.

This is the first design from our summer '09 push to post new designs. It took a little longer than hoped to get the first Construction Print set posted, but that always seems to be the case. Next we are going to focus on the XHouse3, as we see its moderate size and compact footprint being appropriate for the times. Look for it in early 2010.
The XHouse2 at lamidesign.com/plans
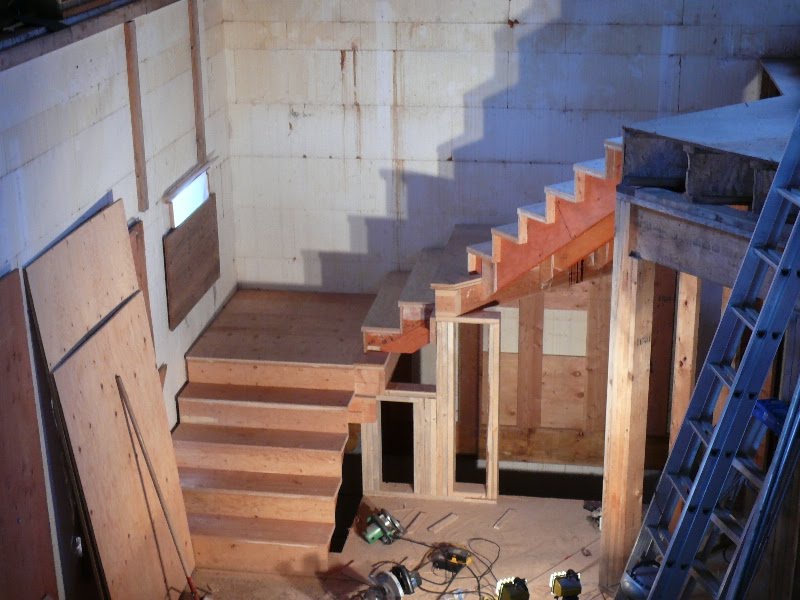
 I've got the steps up to the second landing done. If anyone ever tells you that stairs are easy to build... they're lying.