Showing posts with label Roofing. Show all posts
Sunday, November 1, 2009
Shingling All Done
Wednesday, October 7, 2009
Plumbing Vent Details
The vent flashing is also just like the chimney flashing in that the shingles sit on top of the flashing on the upside of the slope, and the flashing sits on top of the shingles on the downside of the slope.
On underside of the roof, the pipe is secured to the roof framing with pipe strapping. The bottom end of the vent stack will eventually connect to the rest of the DWV (drain/waste/vent) system.
Monday, September 28, 2009
Main Ridge Vent Finished
Today I finished the main ridge vent and have the top three feet of shingles installed from end to end now.
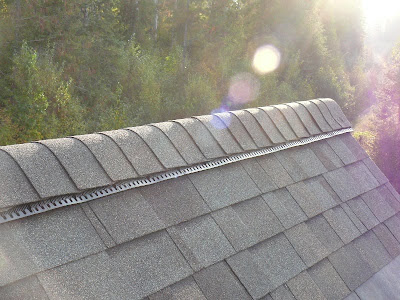
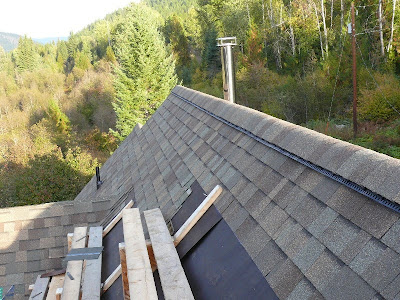
In a post about a week ago, I talked about the details of installing the ridge vent and cap shingles, and I mentioned briefly about nailing the last cap shingle down and covering the nails with silicone.
All along the ridge vent, each shingle is nailed so that the next cap shingle covers the previous shingle's nails. That's why you can't see any nails along the top. However, when you get to the end, obviously you still have to nail the last shingle down, but because it's the last shingle, there won't be another shingle to cover those nails.
So, you cover the nail heads with a bit of brown silicone, then you sprinkle a few shingle granules on top and press them lightly into the wet silicone. (There's always a bunch of loose shingle granules inside the plastic wrap from the bundles of shingles.)
The nail heads all but disappear, and from ground level you won't be able to tell at all.
Here's with the nails showing.
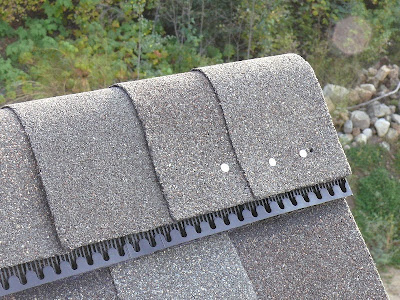
Here's with a bit of silicone.

Here's with the shingle sprinkles.
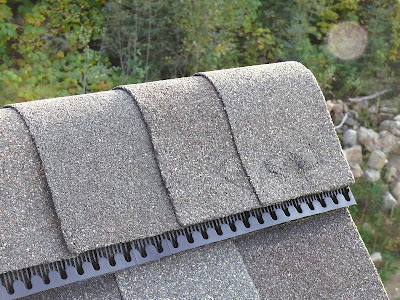
In a post about a week ago, I talked about the details of installing the ridge vent and cap shingles, and I mentioned briefly about nailing the last cap shingle down and covering the nails with silicone.
All along the ridge vent, each shingle is nailed so that the next cap shingle covers the previous shingle's nails. That's why you can't see any nails along the top. However, when you get to the end, obviously you still have to nail the last shingle down, but because it's the last shingle, there won't be another shingle to cover those nails.
So, you cover the nail heads with a bit of brown silicone, then you sprinkle a few shingle granules on top and press them lightly into the wet silicone. (There's always a bunch of loose shingle granules inside the plastic wrap from the bundles of shingles.)
The nail heads all but disappear, and from ground level you won't be able to tell at all.
Here's with the nails showing.
Here's with a bit of silicone.
Here's with the shingle sprinkles.
Saturday, September 26, 2009
Roofing Progress on the Back of the House
Sunday, September 20, 2009
Ridge Vent Details
When you build a roof, it has to be built so that air can move freely between the underside of the roof surface and the top surface of the roof insulation. One of the methods by which this is done is to use a ridge vent. This diagram gives you an idea of how it works.

You can see the long narrow opening along the peak of the roof. The opening is approximately 1.5" wide, and runs the entire length of the top of the roof except for about 4' on either end.

The ridge vent is made of flexible plastic and comes in a roll 30' long and 14.5" wide. It gets folded over the peak of the roof and nailed down along the edges. It allows air to flow up through the slot in the roof and out the sides of the vent.


The cap shingles are installed on top of the ridge vent. You start installing the shingles on one end of the roof, and install them so that each shingle is overlapped by the next one. The nails are always covered by the next overlapping shingle... except for the last shingle. On that one, I'll put some silicone sealant on top of the nail heads.

You can see the long narrow opening along the peak of the roof. The opening is approximately 1.5" wide, and runs the entire length of the top of the roof except for about 4' on either end.
The ridge vent is made of flexible plastic and comes in a roll 30' long and 14.5" wide. It gets folded over the peak of the roof and nailed down along the edges. It allows air to flow up through the slot in the roof and out the sides of the vent.
The cap shingles are installed on top of the ridge vent. You start installing the shingles on one end of the roof, and install them so that each shingle is overlapped by the next one. The nails are always covered by the next overlapping shingle... except for the last shingle. On that one, I'll put some silicone sealant on top of the nail heads.
Monday, September 14, 2009
Getting Ready To Shingle Again
Thursday, September 10, 2009
Wednesday, September 9, 2009
Flashing The Front Of The Dormers
Any time there's a change in a wall-to-roof plane, it's a possible trouble spot for moisture problems. I've installed aluminum flashing (known as apron flashing) where the main roof meets the front wall of the dormer. The flashing sits on top of the shingles and then continues up the wall underneath the housewrap. This gives the best protection against water getting underneath the shingles.
At the corners of the dormers, I've also fashioned a kick-out flashing which continues past the step flashing. This will prevent water from running down the side of the dormer and turning the corner to possibly get in underneath the apron flashing.
Once everything was in place, I added a bit of silicone sealant to the inside seams and brought the housewrap down in front of the flashing.


At the corners of the dormers, I've also fashioned a kick-out flashing which continues past the step flashing. This will prevent water from running down the side of the dormer and turning the corner to possibly get in underneath the apron flashing.
Once everything was in place, I added a bit of silicone sealant to the inside seams and brought the housewrap down in front of the flashing.
Wednesday, September 2, 2009
Subscribe to:
Posts (Atom)