Tuesday, January 12, 2010

Contest House - quick walk through the house

Take a quick walk around the house with me.


lagomhouse12jan10_01s


In the living room - I need to add some color to the foreground furniture, hmm..


lagomhouse12jan10_02s


Over in the kitchen - I think there is plenty of room even with a table.


lagomhouse12jan10_03s


Come upstairs to a bedroom - this is the master bedroom, not gigantic but fits a queen.


lagomhouse12jan10_04s


Upstairs hall - the window seat at the top of the steps, linen cabinet, and the homework desk.


Ok folks, its officially time for me to start lobbying you for your vote. When voting opens on the FreeGreen site I will be posting links and humbly asking you to vote for the Lagom House. Contests are to win after all, and even though this design will always make its way into our catalog it would certainly be nice to have a contest win as a feather in its cap. Stay tuned for me to beg your support.


Saturday, January 9, 2010

sub-flooring/sheathing

This past week we finished nailing in the sub-flooring, added wall sheathing, started putting up the trusses, and cut out some windows. (1/4 - 1/8)

-Monday: We started nailing in the 3/4" waterproofed sub-flooring as well as the wall sheathing. We used 1/2" plywood for the walls.

-Tuesday: We finished nailing in the sub-flooring, and continued to add wall sheathing.

-Wednesday: We cut out several windows, and put up even more sheathing.

-Friday: We did some clean-up on the site, built a temporary floor over the stairway hole in the second floor, and several more trusses were put up.

Sunday, January 3, 2010

Main Bathroom Drain Installation

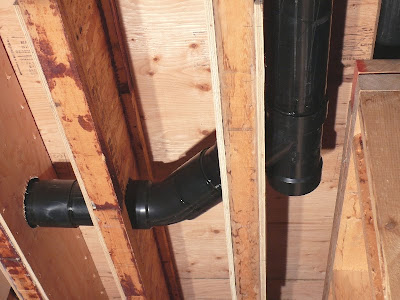
I've started to install the drain system for the main bathroom. It's much easier to run the drain pipes parallel to the floor joists (i.e. in-between the joists), than to run them perpendicular to the joists (i.e. through the joists), but unfortunately I found it was unavoidable to have some of the pipes run perpendicular to the joists.

To install the drain lines I had to cut out some 4.5" holes in the floor joists. Although it seems that cutting such a large hole in the joist would weaken it, the engineering specifications for the joists do allow for holes of this size to be cut out.

Also, in an earlier post I mentioned that I was reinforcing the joists with plywood on one side so as to stiffen up the floor. Where I've had to cut holes in the joists for the drain lines, I'm installing the reinforcing plywood on both sides.

Ideally, the plywood reinforcement should be applied before I run the pipe through the joists... and for the most part I've done that. There are a couple of instances where I couldn't, so I'll have to cut some slots out of the plywood and fit it around the pipe afterwards.

Once I had the holes cut out, I started threading the pipe through in sections approx 12" long. The sections are joined together with ABS cement and a coupling fitting.


The odd shaped fitting on the right-hand side of the photo below is where the plumbing vent line will attach to the drain line.


A coupling fitting on the end.


That's a cleanout fitting on the right... to allow for access to the pipe in the unlikely event (I hope) that the drain gets really plugged.